Docs |

1. Short Introduction
jsapp.cloud is the efficient solution for web applications based on CLOUD resources .
A collection of web services, tools, and web interfaces that creates the foundation for the fast development of modern, secure applications.
It offers an optimized backend and a lightweight client to build highly scalable web applications. It is secure and adheres to current standards for web development.
The backend is based on RESTful web services and implements all the required services for your web app, offering support to add new APIs as needed by your system integration. The solution is tailored around Amazon AWS CLOUD services to provide one of the best environments for web apps. jsapp.cloud does not host your developed application by default; you will need to install the required resources in an Amazon AWS account, being in total control of your data privacy and services management.
Powered by NodeJS, the backend services covers:
- authorization, based on JWT
- CLOUD file access, based on S3 and data stream encryption
- database access API's for PostgreSQL
- application API's
- web server
- management interfaces
Proposed web client interfaces are based on HTML5, Bootstrap and VueJS.
The client application is hosted by the application web server and stored in encrypted CLOUD files by default.
Development is CLOUD based, the client interfaces is carefuly designed to offer on demmand resources loading
being used for very big web apps or small ones alike.
The system is secured and can be used to develop applications for sensitive databases.
Users, groups and access right are managed based on high security standards.
You can develop fast web applications whether are small or large. Most of the backend and frontend is covered, all you need to do is to implement your app interfaces and business logic.
On demand resource loading:
Helps the application to start faster by loading only the initial files. All required routes and components will be loaded quickly upon request.
This model helps you :
- to build huge applications with practically unlimited number of routes
- continue development model, some parts of your live app can be under development or modified while the app is used in production
High scalability:
Horizontal scaling using small VPCs in parallel and load balancing provides a more reliable and cost-effective solution.
The web server resources (HTML, CSS, JS, the web app ) are stored in the S3 file system, offering a single source similar to a custom CDN.
The cloud IDE assists with secure multi-developer access. The application development model does not require 'build' or server resource uploads to be updated.
Applications for the enterprise:
A virtually unlimited number of users; the application can scale for very large companies. Support for large applications and access rights based on user groups and app roles is available.
Built-in security against different attack types. Encrypted S3 file storage, encryption / decryption of data streams for high efficiency , and a DRIVE app module with folder-sharing options.
A lower development budget offers support for international applications and documentation. It respects EU GDPR legislation for personal data storage and access.
1.1. About
The presented solution development started in 2014 with some of the web services and continued over the
years
with new parts or features required for differrent custom designed applications.
It is used in productions for ERP, CRM and custom web apps for many years.
Part of it's services and tools are based on webdo.com solutions,
adapted for enterprises.
The web client uses the production latest versions for CSS, framework and utilities.
The jsapp.cloud is created and supported by Q-bis Consult SRL
You may ask your questions here.
2. Simple CRM ( demo app )
It provides:
- customers list / customer file management;
- products list; - orders list / order file
The module offer basic required fields.
It starts with three lists (customers, orders, products). The first lists are presented as fixed tabs.
From the "list of customers" you can open a "customer file", that offer a view of the customer data and attached information like calls, orders and files.
The "customer file", "call file", "order file" will have a temporary tab that can be closed.
Icon buttons or blue links are used to navigate/open the "file".
Press the + button in "customers list" to add a new customer.
Press the "folder" button in "customers list" or the customer name as link to open the customer file.
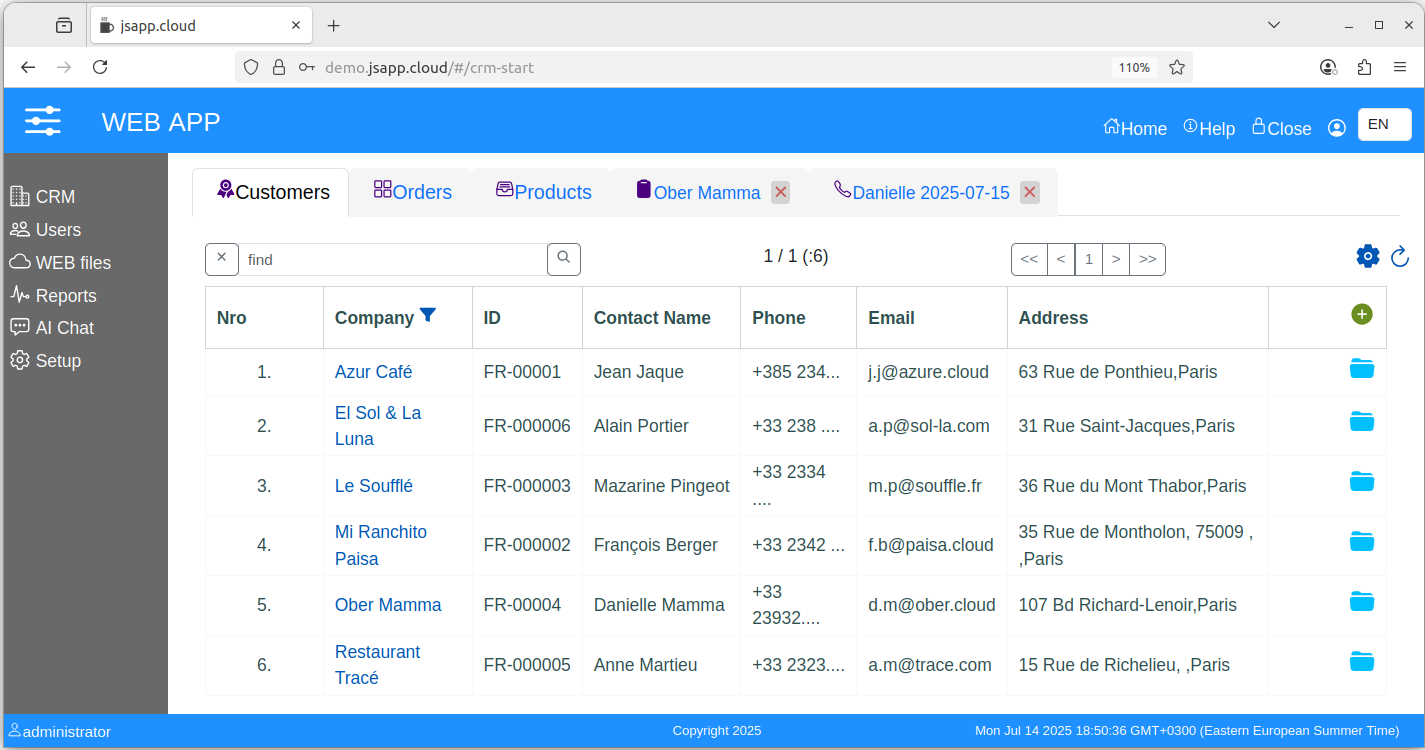
The "customers list" is based on a grid like table with pagination. It uses a custom component, see the "start-crm" route in the "crm" app module (code).
The source code is accessible upon installation.
While this is a working module it lacks features and restrictions to be used in production as it is, still it can be a base to develop something better.
2.1 products ( demo )
A list of products.
Add products and edit products ...
2.2 Orders ( demo )
A grid list with pagination as an orders list.
Orders are added from the CRM -> Call-file tab page ( initially created from a call-file products list ).
Use this list to access last orders, filter etc ...
Open one order-file from the rows links or row "folder" icon button.
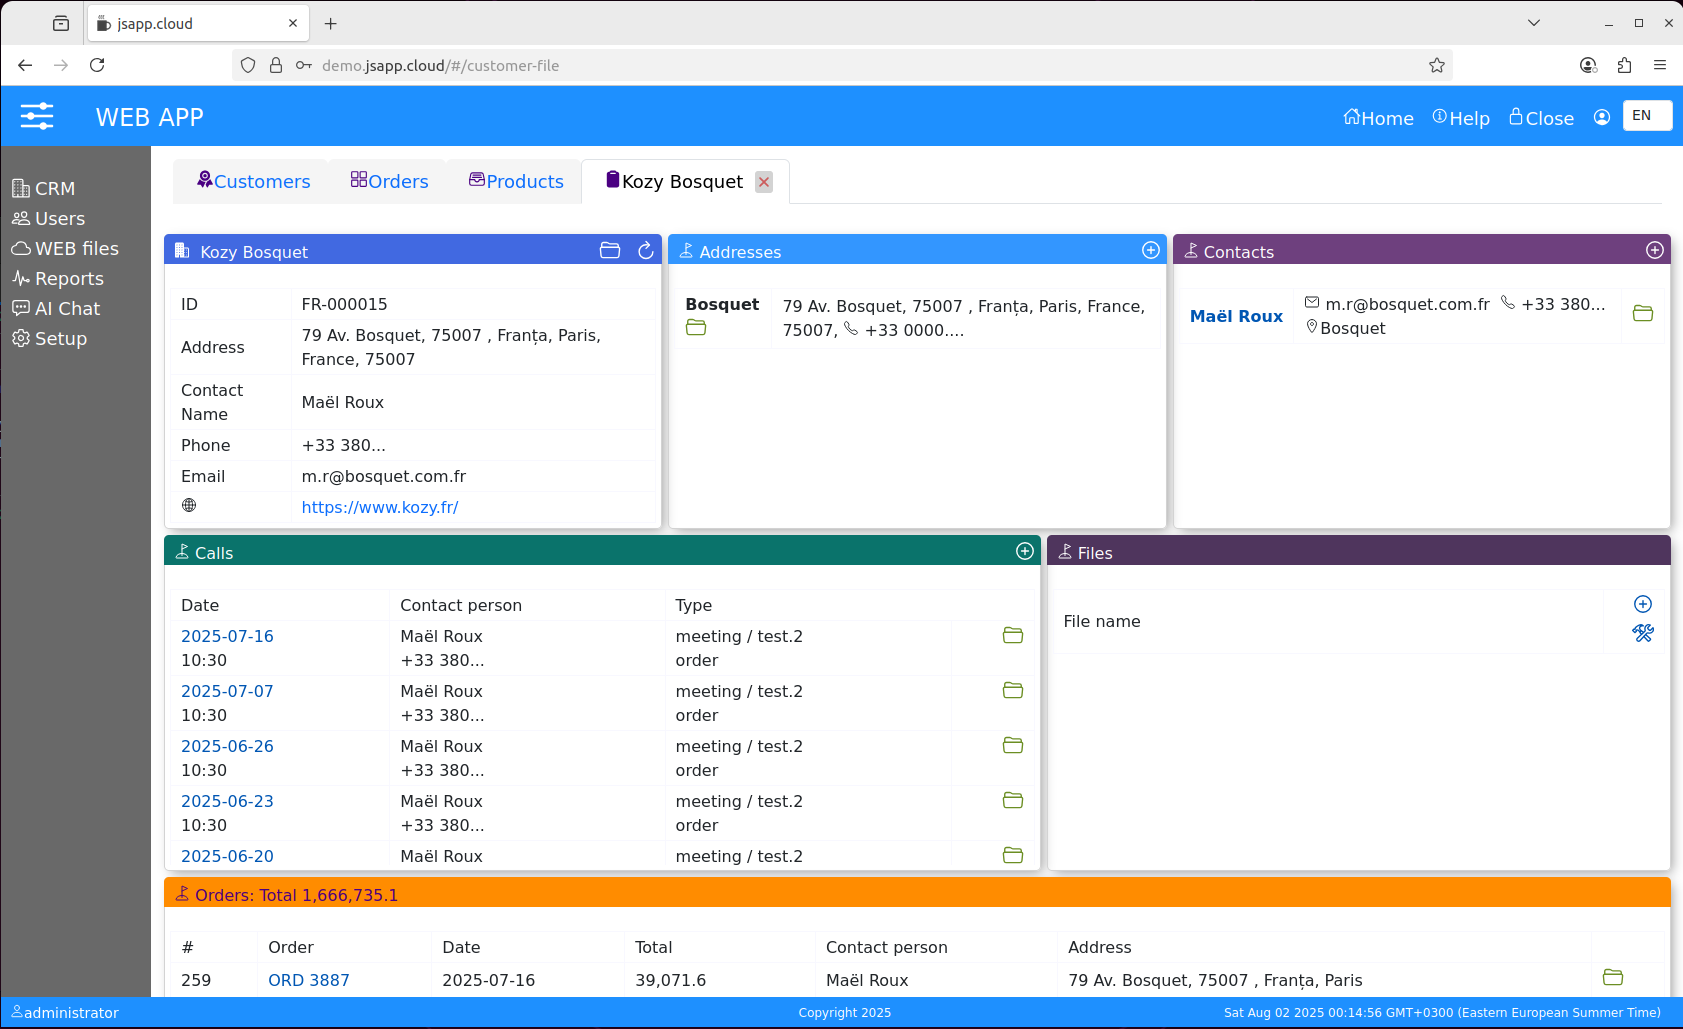
2.3 Customer-file ( demo )
It is a medium size route that samples different actions and data views.
The first route to show attached files, it is a nice feature to add unstructured data to your data view.
Files are stored encrypted in the AWS S3 bucket.
It uses cards to show different kind of information in highlighted areas:
- company info;
- addresses list
- contacts list
- calls list
- files / files related to the company, you can add files also on "call-file" or "order-file"
- cmpany orders list
All cards have icon buttons for "add" / "edit" actions.
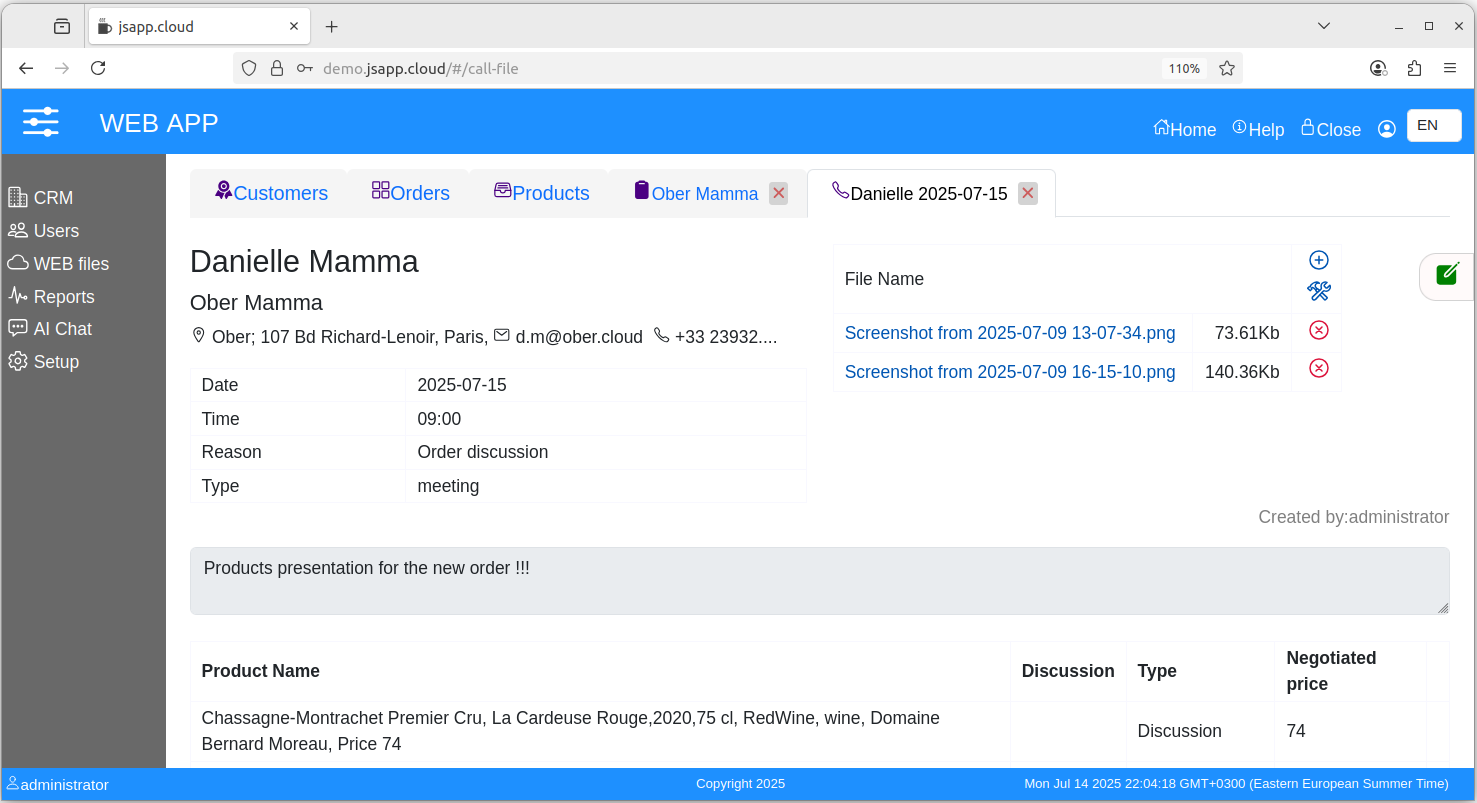
2.1 Call-file ( demo )
Can have attached files.
It has an list of discussed products that can be transformed into an order.
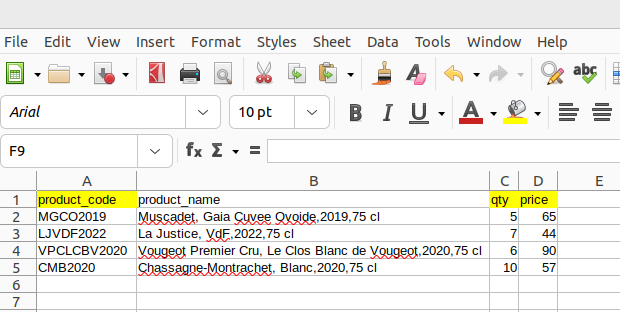
Optionally the products list can be uploaded from an Excel file.
The Excel XLSX file should have next fields: product_code, qty, price
Download file
2.1 Call-file ( demo )
Can have attached files.
Optionally the products list can be uploaded from an Excel file.
The Excel XLSX file should have next fields: product_code, qty, price
Download file
3. Web files
Encryption/decryption is made on the data upload/download stream at rest and protected by SSL on tranzit.
Use it to store important files, you can share folders with other users or users groups.
This is a default module tha comes with the provided web client.
The File manager can be used as an CLOUD IDE for your web application files, based on ACE.
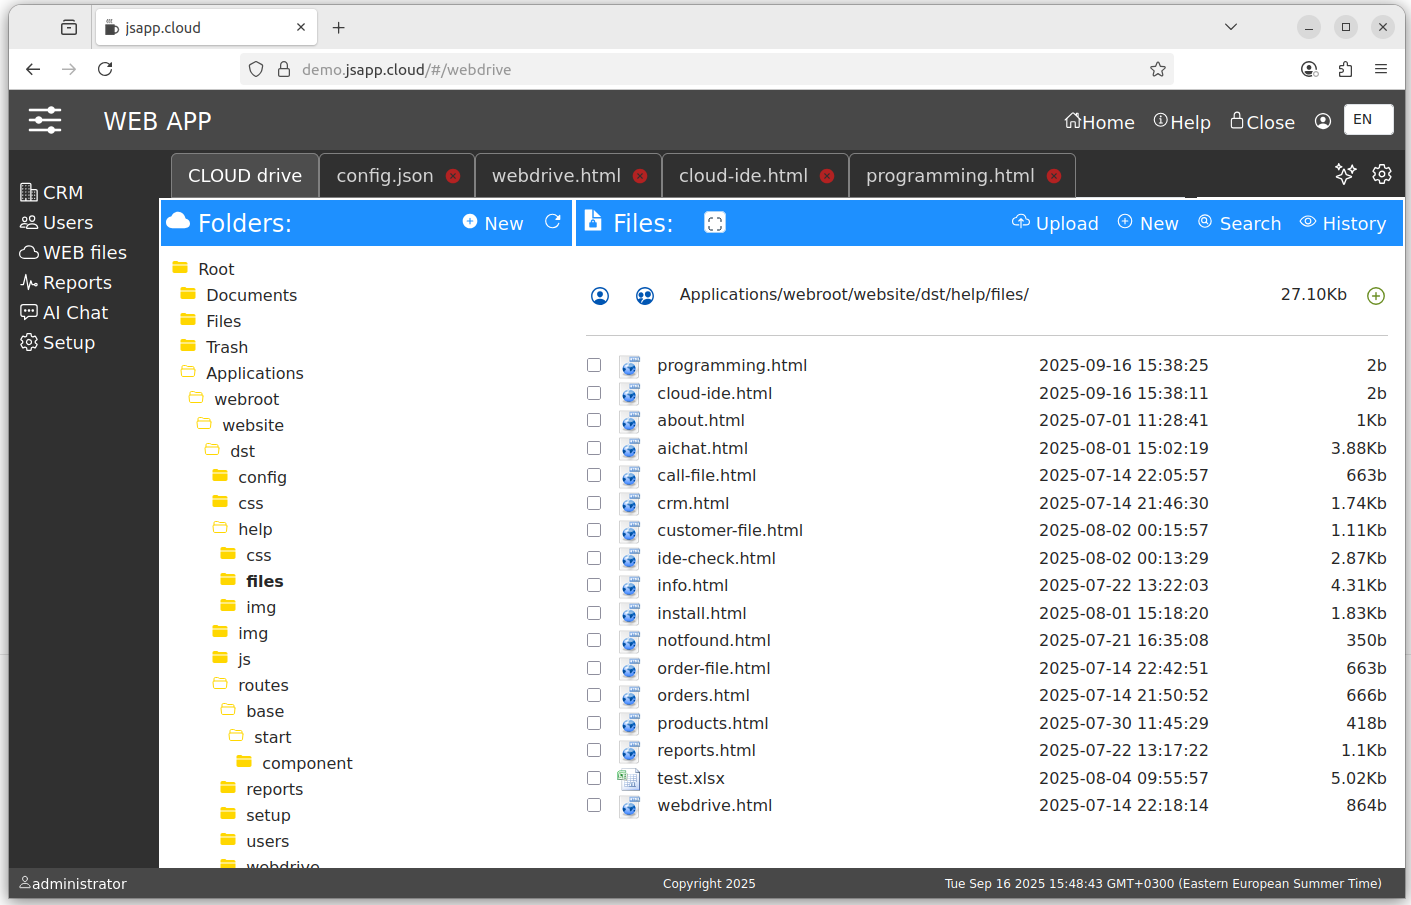
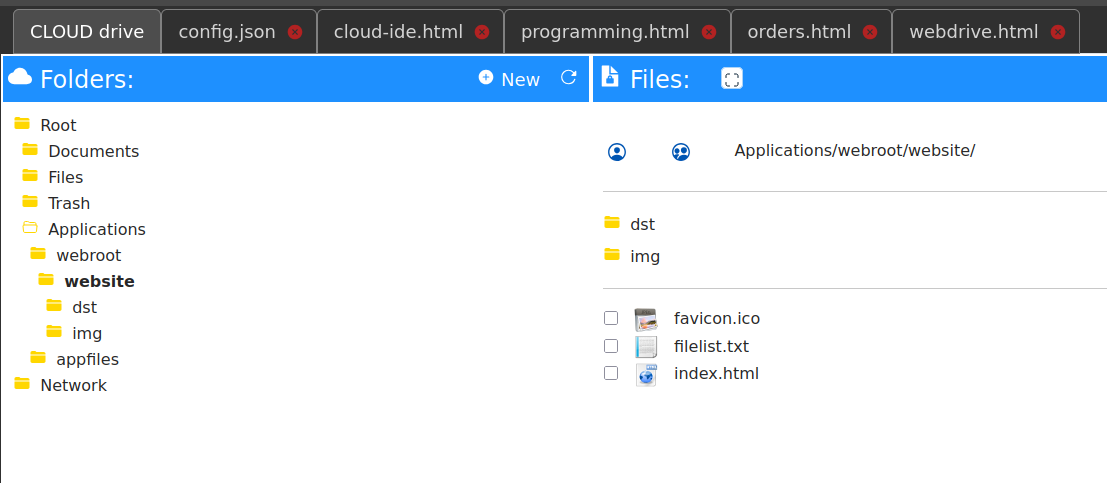
User Interface UI
The Web Files module, it is split into two parts:- folders
- files.
There are default folders (Documents, Files, Trash, Applications, Network).
"Documents" and "Files" are used for your own files ; create sub-folders as you need them.
"Trash" stores deleted files ; you can permanently delete them or recover them.
"Applications" stores files used by the WEB APP ; files can be stored here as well; however, this is a system folder.
In the "Network", you can find folders that are shared with you or with a user group of which you are a part .
New Folder
Use next options to create a new folder:
- "New" button in top left part of the module page. ( "Folders" bar )
- " + " button, right ( under "Files" bar ) when a folder is open.
Upload Files
In the "Files" bar, press the "Upload" button ; a new window is now open.
Select the files and upload them into the opened folder.
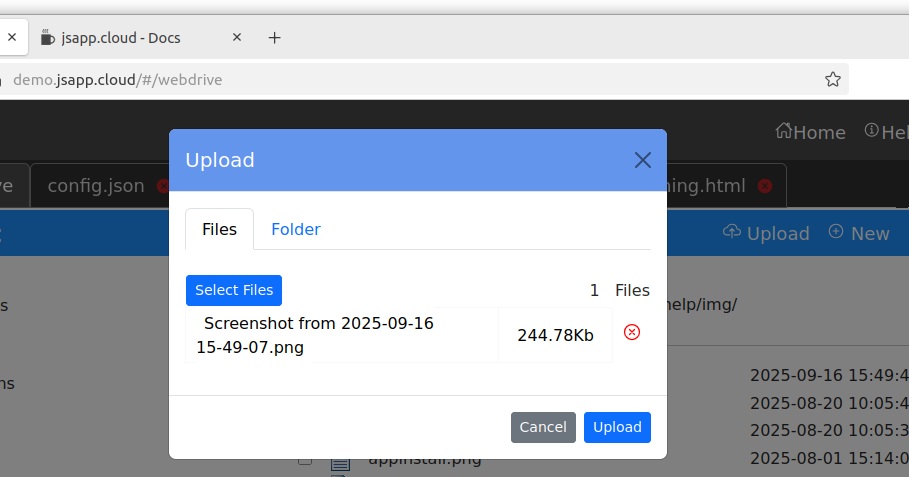
Click on a file to download it. Upload Folder
Using a modern web browser the upload folder is available. Press the "Upload" button and chose "Folder" in the new window. Press "Start upload" button and next "Select Folder", the web browser will ask for operation aproval like in next image (can be different on your computer).
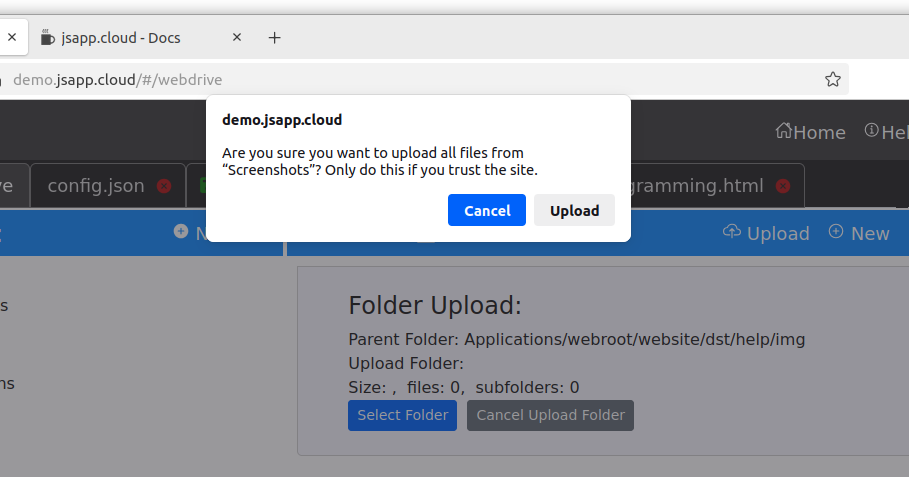
Choose the desired folder from your device and follow the upload steps.
The selected folder and sub-folders will be uploaded.
Do NOT close the browser page until the upload is done. You will have the status all the time.
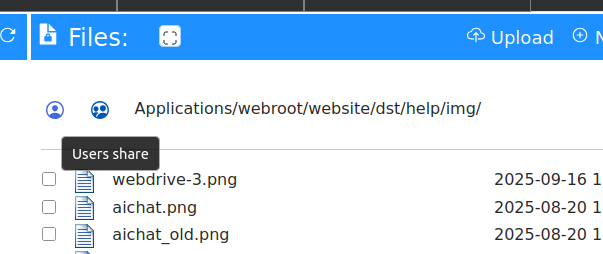
Share Folder
Use share folder to give access to an user or an user group.
You can share with access rights:
- read only ( files can be downloaded, upload is not available )
- write ( download and upload are available )
Use the buttons ( see the image bellow ) to add users or users goups to the share access for one folder.
Files bar, available for an open folder.
The default folders (Documents, Files, etc.) cannot be shared ; only sub-folders can be shared.
Search
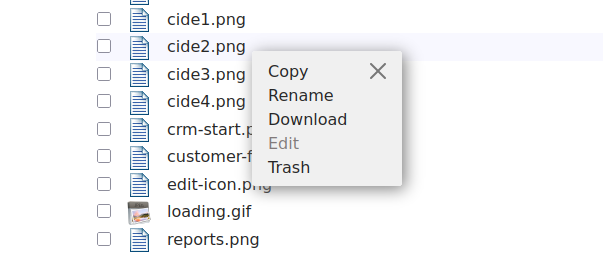
The search is available in the current sub-folder, it will search only in fils names. The files are encryted, and for security reason an index file is not possible. Press "Search" button in the right of the "Files" bar. File shortmenu
Mouse right-click on a file to have a short menu with available options.
( rename file , trash ... )
Copy Paste
Select one or more files and press "Copy" on the "Files" bar, navigate to another subfolder and press "Paste" to copy files there.
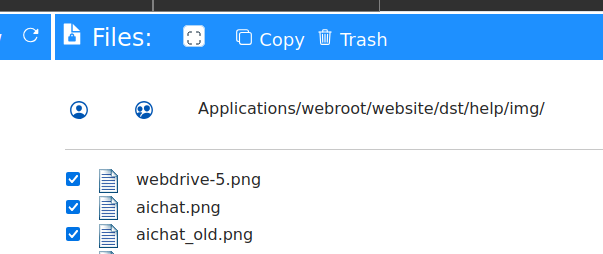
Trash files
Select one or more files and press "Trash" on the "Files" bar. To recover the files, open the "Trash" folder, select files and press "Recover".
3.1. CLOUD IDE
Text based files can be edited, ACE editor is used. Mouse hover over one file, the EDIT button will be visible. Press EDIT button, the file editor will be opened in a new tab.

the file editor offer some features like "pretty", "colapse", AI assistant. You can chose an editor Theme from ACE available list.
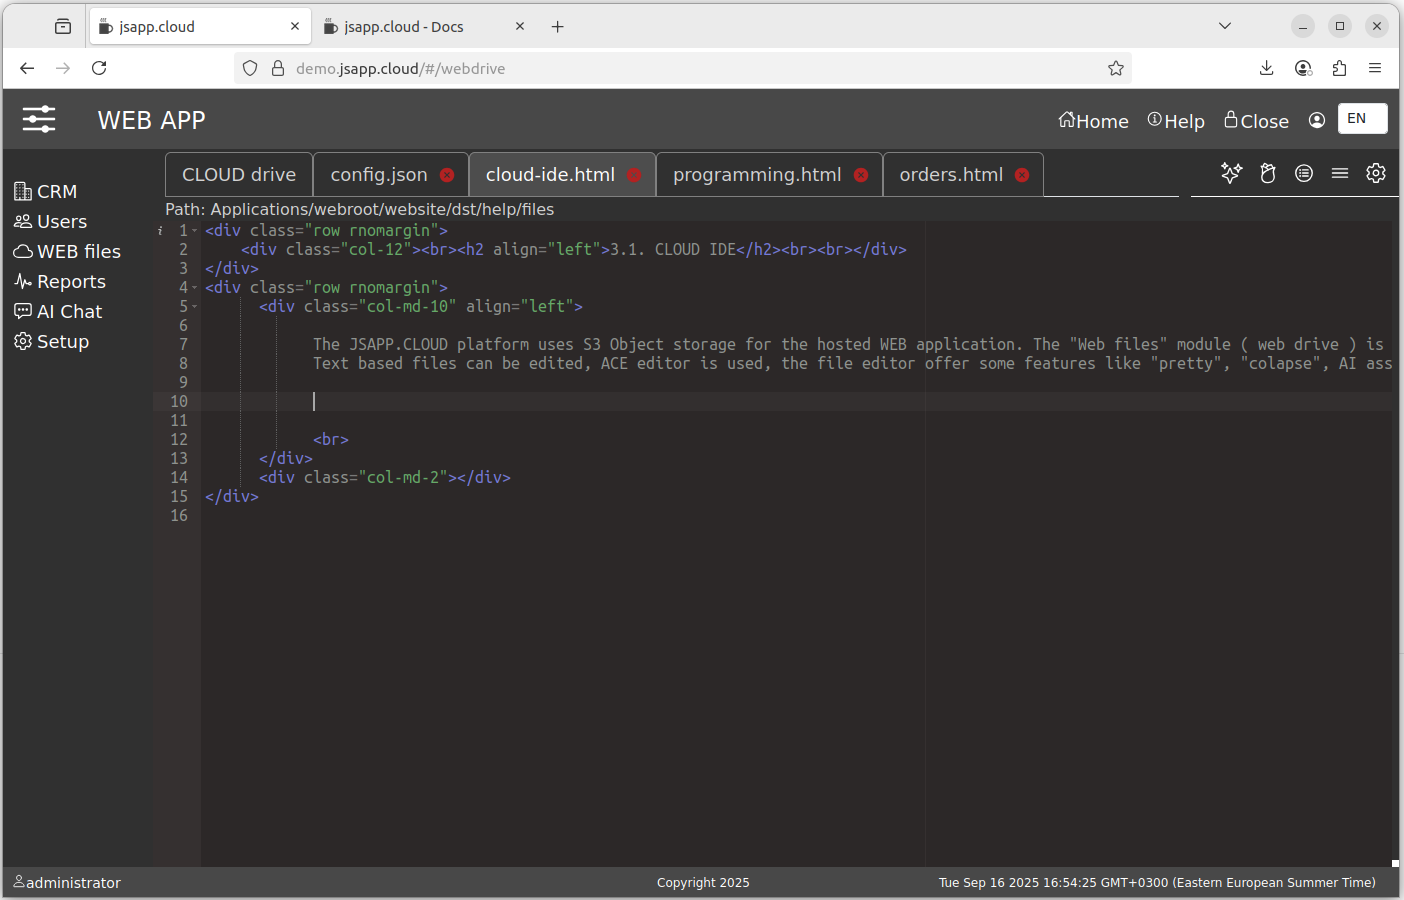
The web application is stored on S3, the relative "folder" is "Applications/webroot/website" ( "administrator" account ).
The CLOUD IDE is based on the ACE editor, a modern text file editor with syntax checking, error highlighting , text highlighting , and autocompletion .
We added features to create pretty code, to collapse the code, and an AI assistant.
The AI assistant uses one of the OpenAI models of your choice.
Following the platform documentation, you can build your own web application starting from the basic web client and initial modules and routes.
The JSAPP.CLOUD offers a web client application that is used to start a new web app.
This is standard ; of course, you can start a web app from scratch and use only the platform backend.
The proposed web client comes with default modules (user management, settings, reports, web files), a lazy loading model that offers app scalability,
an integrated contextual help system, international labels and an easy-to-navigate user interface.
In this context, having the CLOUD IDE embedded into the WEB Application offers the fastest programming environment:
- no build/upload required
- no F5/page refresh to test a route
- the CLOUD IDE will open the files used last for editing automatically .
- focus only on routes/components as the main WEB app is already made.
When the CLOUD IDE is used, the web app enters DEV mode ; when you navigate to a route, it is reloaded, so you do not need to refresh your web app to test the new code.
4. Reports
Can get data from the SQL API, can modify and prepare the data for the view.
It can run after query javascript to prepare the view for graphs or data analysis.
Offers reports like lists, CrossTab, Pivot Table, complex multi-tab/multi-sections reports with graphics, data and text can be created.
It can integrate third-party API calls to analyse the data more and present it in a selected or a custom view.
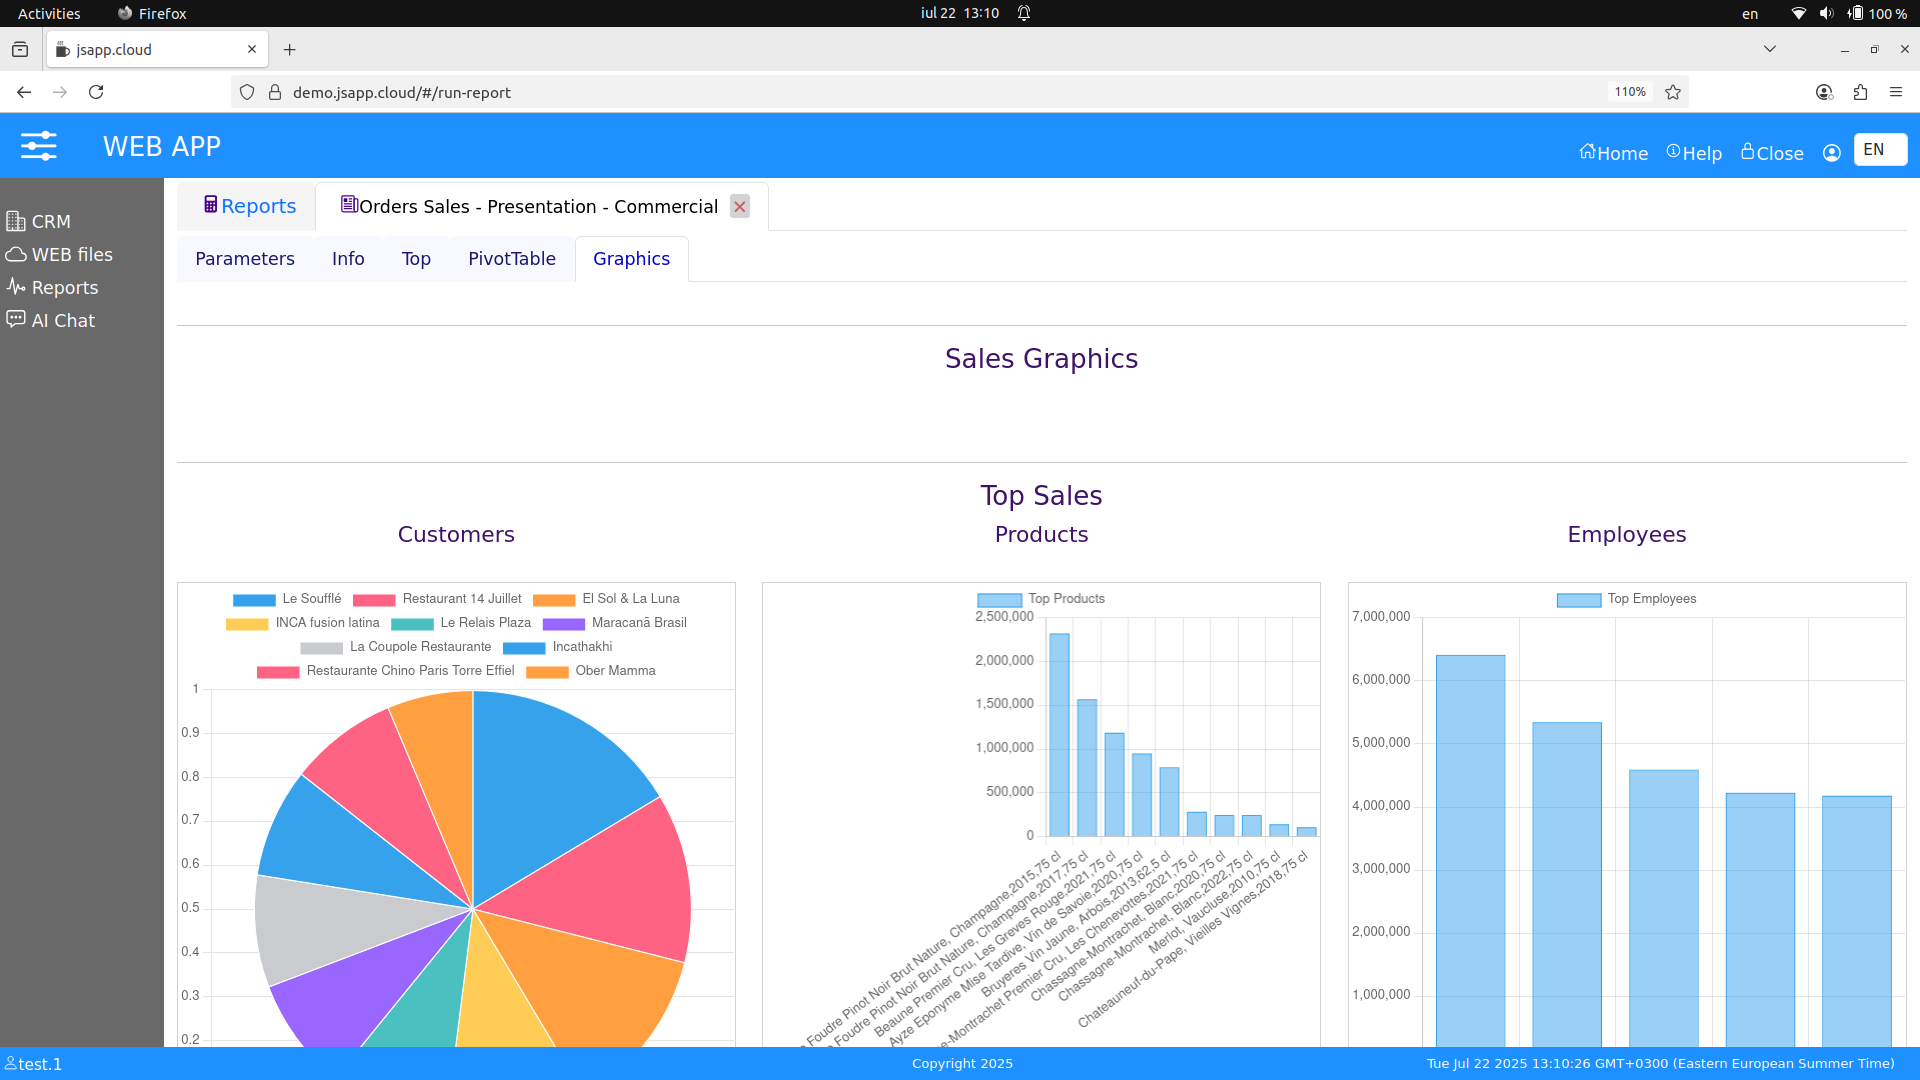
A report from available reports in this demo "Orders Sales - Presentation", it offer different views on report tab pages. Info - short info data, Top - top reports, PivotTable as in it's title and presented page Graphics.
5. Third Party API integration - AI Chat ( demo app )
The implementation is simple, it just allows TEXT messages and does not save a record of the messages.
A sample of a ThirdParty API integration, OpenAI API.
It requires an OpenAI API KEY, get it from here https://platform.openai.com
Test the module here https://demo.jsapp.cloud
a working module, no KEY required. ( Demo User: test.1, pass:Test1 )
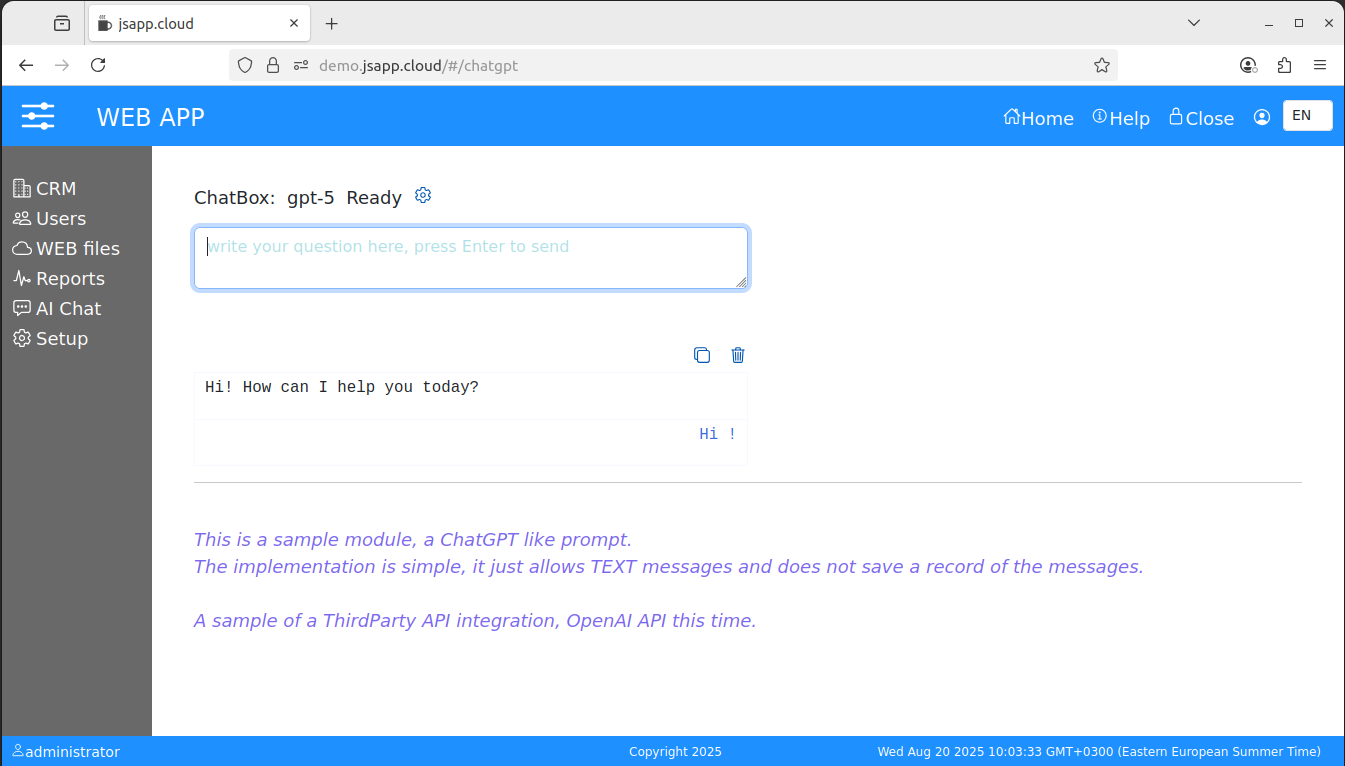
Ask something, it is connected to the OpenAI.
The BackEnd JS ( NodeJS) script it has less than 100 code lines with included comments and spaces.
Part of the "extra.js" custom API extensions of the JSAPP application server.
        ...
        openai:function(req,res){

			// sample ThirdParty API integration
			// OpenAI in this case //

			// required parameters :
			// - ask for AI text
			//		- chat ( type = text )
			// - set API key
			//		- setkey ( type = object)


			var bucket = process.appconfig.aws.bucket;
			var file = "config/openai.key";

			function askchatGPT(){

				// ChatGPT - OpenAI - API - text ask the oracle :) //
				// OpenAI docs :
				// sample : https://blog.bitsrc.io/interacting-with-openai-in-node-js-and-express-647e771fc4ad

				async function asyncCall() {
					const { OpenAI } = require('openai');
					const openai = new OpenAI({ apiKey: process.openaikey.key });  // process.openaikey.key
					const response = await openai.responses.create({
				    	model: process.openaikey.model,
				    	input: req.body.chat
					});
					return res.send(response);
				}
				asyncCall();
			}

			function resetkey(){
				// set the OpenAI API Key //
				var openaikeydata = false;
				try{
					openaikeydata = JSON.stringify(req.body.resetkey);
				}	catch(x){
					return res.send({error:"invalid key data object, required .... "});
				}
				//  write file //
				process.s3util.putfile(bucket,file,openaikeydata,function(err,data){
					if(err){
						process.openaikey = false;
						return res.send({error:"can not save the API KEY"});
					}
					if(data){
						process.openaikey = req.body.resetkey;
						return res.send({ok:data});
					}
				});
			}

			function check4openaikey(){
				// check if the OpenAI API Key is set //
				process.s3util.headfile(bucket,file,function(err, metadata){
					if(err){
						return res.send({error:"openai key not found!"});
					} else {
						process.s3util.getfile(bucket,file,function(err,data){
								if(err){
									return res.send({error:"can not load the API KEY"});
								}
								if(data){
									//console.log("openai KEY is:",data);
									try{
										process.openaikey = JSON.parse(data);
									} catch(x){
										return res.send({error:"can not load the API KEY"});
									}
									if(req.body.chat && process.openaikey){
										askchatGPT();
									}
									if(!req.body.chat && process.openaikey){
										return res.send({ok:"API key loaded",model:process.openaikey.model});
									}
								}
						});
					}
				});
			}

			if(!process.openaikey && !req.body.resetkey){
				check4openaikey();
			} else {
				if(req.body.chat && process.openaikey){
					askchatGPT();
				}
				if(req.body.resetkey){
					resetkey();
				}
				if(req.body.check){
					return res.send({ok:"API KEY FOUND",model:process.openaikey.model});
				}
				if(!req.body.chat && !req.body.resetkey && !req.body.check){
					return res.send({error:"invalid parameters"});
				}
			}
	}
    ...
6. Install THIS
Follow the implementation steps described into the official help here
The Demo Application can be installed using the "WEB app Settings" utility ( starts at https://your domain name:3200 ).
The "Apps" tab.
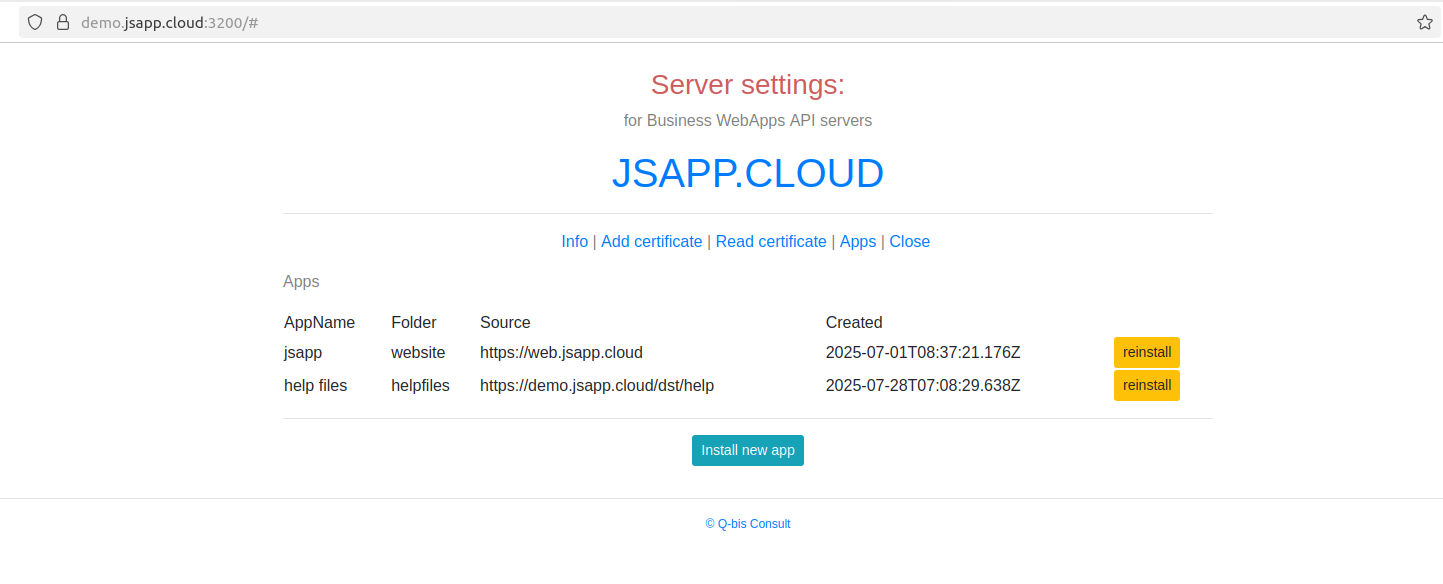 The web app is distributed as a list of files available at the distribution web address (a txt file named "filelist.txt" ).
The setings app reads the list and copies the files accordingly.
Use: Folder: website
Install from address: https://demo.jsapp.cloud
The CE AMI instance will come configured with the DEMO database in a local PostgreSQL database server for your convenience.
The PostgreSql databases are "crmdemo" and "rapidcomed01", the "crmdemo" has the Demo database, the "rapidcomed01" it is used py the SQLAPI to store information about the used database and queries.
After the installation, the WEB App can be modified using the CLOUD IDE included into the Web Drive module, the app files are in Applications/webroot folder.
You will need to configure the SQL API server also at https://your domain name:3400 , the management interface for the SQL API. ( manages Queries )
7. Programming JSAPP.CLOUD
The JSAPP.CLOUD offers a web client application that is used to start a new web app.
This is standard ; of course, you can start a web app from scratch and use only the platform backend.
The proposed web client comes with default modules (user management, settings, reports, web files), a lazy loading model that offers app scalability,
an integrated contextual help system, international labels and an easy-to-navigate user interface.
See the platform documentation here. The backend can be programmed as well.
The storage for the application is AWS S3. Files are stored encrypted, as are all files used by the platform.
The location of the files is the "Application/webroot/website/" folder (administrator account).
See the "Web Files" module. You can use the available CLOUD IDE for programming, or you can upload the final project using the Web Files folder upload option.
The default web client offered uses Vue.js and Bootstrap, the back-end is NodeJS.
The Web Files module offer zip folder option, it does not have unzip, but you can use folder upload.
JSAPP.CLOUD CE release comes with an embedded PostgreSQL database and one demo application as an example of routes and components and how an application works with this platform and the delivered web client. The PostgreSQL database should be managed with an external application like PgAdmin. (You should edit the pg_conf file to enable access to your station on the EC2 instance and the security group to allow access to your IP for the PostgreSQL port). It helps to start a new WEB application development faster by having sample code and a working module to begin with or use as reference .
A CLI local application/script is under development and will offer an application upload option . See the platform documentation for availability.
Having the file stored on AWS S3 gracefully solves the problem of having multiple sources for the files when parallel scalability is used, and it does not require an external CDN system where caching problems may occur.